Leduyquang753 (talk | contribs) m (Leduyquang753 moved page Developing World Generator Plugin to Developing a World Generator Plugin: The grammar of the title is incorrect.) |
Leduyquang753 (talk | contribs) (Added more contents) |
||
| Line 70: | Line 70: | ||
<syntaxhighlight lang="java">SimplexOctaveGenerator generator = new SimplexOctaveGenerator(new Random(world.getSeed()), 8);</syntaxhighlight> |
<syntaxhighlight lang="java">SimplexOctaveGenerator generator = new SimplexOctaveGenerator(new Random(world.getSeed()), 8);</syntaxhighlight> |
||
The second argument is the number of octaves. |
The second argument is the number of octaves. |
||
| − | '''Remember not to place the octave generator |
+ | '''Remember not to place the octave generator anywhere else.''' |
* Set the scale of ''generator'' to 0.005D. |
* Set the scale of ''generator'' to 0.005D. |
||
| Line 89: | Line 89: | ||
* Make an integer ''currentHeight'' inside the class. As the name explains, this variable stores the current height acquired from the ''SimplexOctaveGenerator'' each time we work with an (X,Z) coordinate of the chunk. |
* Make an integer ''currentHeight'' inside the class. As the name explains, this variable stores the current height acquired from the ''SimplexOctaveGenerator'' each time we work with an (X,Z) coordinate of the chunk. |
||
| − | * In the ''for'' loop, assign the octave generator's noise of the current (X,Z) coordinate of the world to ''currentHeight'' after |
+ | * In the ''for'' loop, assign the octave generator's noise of the current (X,Z) coordinate of the world to ''currentHeight'' after adding the result with 1, multiplying it by 15, adding it with 50 and casting it to integer. |
The current (X,Z) coordinate of the world can be retrieved by multiplying the ''chunkX'', ''chunkZ''provided and adding each of them with the current chunks's X, Z: |
The current (X,Z) coordinate of the world can be retrieved by multiplying the ''chunkX'', ''chunkZ''provided and adding each of them with the current chunks's X, Z: |
||
| − | <syntaxhighlight lang="java">currentHeight = (int) (generator.noise(chunkX*16+X, chunkZ*16+Z, 0.5D, 0.5D)*15D+50D);</syntaxhighlight> |
+ | <syntaxhighlight lang="java">currentHeight = (int) ((generator.noise(chunkX*16+X, chunkZ*16+Z, 0.5D, 0.5D, true)+1)*15D+50D);</syntaxhighlight> |
Why 15 and 50? 15 - the multiplier is the amount of difference between the highest and lowest possible heights of the world, and 50 is the minimum height of the whole world. You can change these if you want. |
Why 15 and 50? 15 - the multiplier is the amount of difference between the highest and lowest possible heights of the world, and 50 is the minimum height of the whole world. You can change these if you want. |
||
| Line 161: | Line 161: | ||
It's a barely flat, boring world, much like the beginning of Minecraft (the very first version of Minecraft was a flat cube of blocks), but don't worry, we are going to add more stuff into this world later. |
It's a barely flat, boring world, much like the beginning of Minecraft (the very first version of Minecraft was a flat cube of blocks), but don't worry, we are going to add more stuff into this world later. |
||
| + | |||
| + | == Creating block populators == |
||
| + | |||
| + | As explained above, after a new chunk is filled in with the basic terrain, it will meet some ''block populators'' to be filled in with the details and structures, such as: trees, ores, dungeons, mineshafts, etc... |
||
| + | |||
| + | In this section, we are going to create some block populators to spawn some trees, some water and lava lakes, some veins of ore and some dungeons. |
||
| + | |||
| + | === Create a tree populator === |
||
| + | |||
| + | This will make a 50-50 chance of creating 1 to 5 trees per chunk. |
||
| + | |||
| + | * First, create a class named ''TreePopulator'' extending the class ''BlockPopulator''. |
||
| + | |||
| + | If the IDE warns you about making the class abstract, ignore it and continue on the way. |
||
| + | |||
| + | * Override the superclass's method ''populate'': |
||
| + | <syntaxhighlight lang="java">@Override |
||
| + | public void populate(World world, Random random, Chunk chunk) { |
||
| + | // TODO Tree populator's code here |
||
| + | }</syntaxhighlight> |
||
| + | |||
| + | Again, don't make the method abstract even if the IDE warns you. It will be OK. |
||
| + | |||
| + | * Use the provided ''random'' inside the method to make the chance of spawning trees: |
||
| + | <syntaxhighlight lang="java">if (random.nextBoolean()) { |
||
| + | // TODO Tree generation code here |
||
| + | }</syntaxhighlight> |
||
| + | |||
| + | * Inside the ''if'', make a ''for'' loop of an integer ''i'' running from 1 to a random integer from 1 to 5. |
||
| + | |||
| + | * Inside the ''for'' loop, generate a tree on a random location. Luckily, we don't have to build the tree block-by-block. Instead, we get the highest block on a randomly chosen (X,Z) coordinate of the chunk and generate a tree on top of the block by an available tree generation method from Bukkit: |
||
| + | <syntaxhighlight lang="java">if (random.nextBoolean()) { |
||
| + | for (int i = 1; i < random.nextInt(4)+1; i++) { |
||
| + | int X = random.nextInt(15); |
||
| + | int Z = random.nextInt(15); |
||
| + | int Y = 1; |
||
| + | for (int j = world.getMaxHeight()-1; j > 0; j--) |
||
| + | if (chunk.getBlock(X, j, Z).getType() != Material.AIR) { |
||
| + | Y = j+1; |
||
| + | break; |
||
| + | } |
||
| + | world.generateTree(chunk.getBlock(X, Y, Z).getLocation(), TreeType.TREE); // The tree type can be changed if you want. |
||
| + | } |
||
| + | }</syntaxhighlight> |
||
| + | |||
| + | === Registering block populators === |
||
| + | |||
| + | Like the chunk generator, every block populators must be registered before they can work. |
||
| + | |||
| + | Inside the ''CustomChunkGenerator'' class, insert this method: |
||
| + | <syntaxhighlight lang="java">@Override |
||
| + | public List<BlockPopulator> getDefaultPopulators(World world) { |
||
| + | return Arrays.asList((BlockPopulator)new TreePopulator()); |
||
| + | }</syntaxhighlight> |
||
| + | Now you can recompile the plugin and see it works in the server. It will be something like this: |
||
| + | |||
| + | [[File:2017-12-13_17.55.44.png|900px]] |
||
''(To be continued...)'' |
''(To be continued...)'' |
||
| + | {{Languages|Developing a World Generator Plugin}} |
||
[[Category:Tutorials]] |
[[Category:Tutorials]] |
||
Revision as of 11:01, 13 December 2017
|
IN PROGRESS
|
Introduction
This tutorial will give you the basic steps of creating a custom world generator using Bukkit. Following this tutorial, you will be making a simple, infinite world of plains and oceans, with some features added.
IMPORTANT:
- Before reading this tutorial, you are required to know the basics of the Java programming language, and the basics of creating a proper Bukkit plugin. If you have not yet, click here.
- This tutorial uses Eclipse as the IDE and Bukkit 1.12+. Other IDEs and Bukkit versions may have some differences.
Set up the project
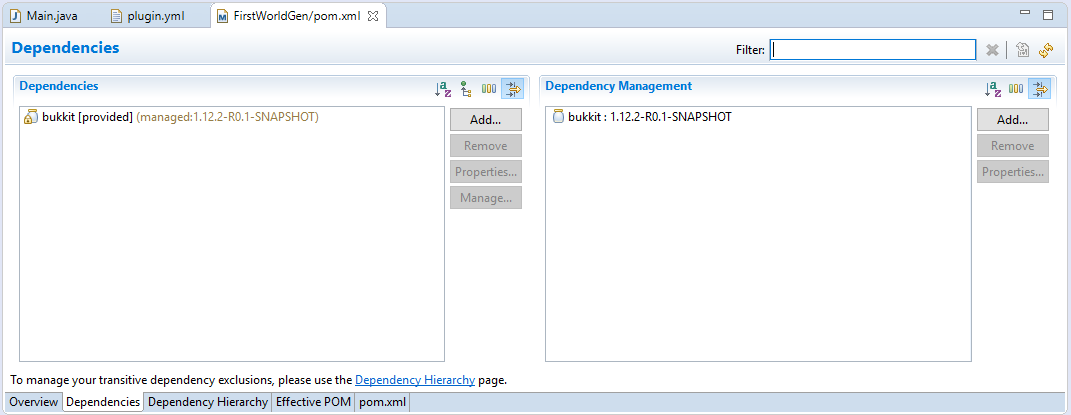
- Create a Maven project in Eclipse, add the Bukkit dependency to the pom.xml and manage it:
- Create plugin.yml in src/main/resources folder, type in your plugin's information. Finally add to the file.
load: startup
- Create the main class in your project's main package. Remember the path to that class must be the same as the main key in your plugin.yml. Override onEnable() and onDisable() in the class with your code.
The main class now should be similar to this:
package {$TopLevelDomain}.{$Domain}.{$PluginName};

import org.bukkit.plugin.java.JavaPlugin;

public final class {$PluginName} extends JavaPlugin {
    @Override
    public void onEnable() {
        // TODO Insert logic to be performed when the plugin is enabled
    }

    @Override
    public void onDisable() {
        // TODO Insert logic to be performed when the plugin is disabled
    }
}
Create a custom chunk generator
A Minecraft's world is divided into small chunks. Each chunk is 16×256×16 blocks and is created by a ChunkGenerator. After that the world meets some BlockPopulator 's to be filled in with the details.
- First, create a new class in the main package extending the ChunkGenerator class. We will call this CustomChunkGenerator.
- Create a method with the @Override annotation. Now it should look like this:
public ChunkData generateChunkData(World world, Random random, int chunkX, int chunkZ, BiomeGrid biome)
public class CustomChunkGenerator extends ChunkGenerator {
    @Override
    public ChunkData generateChunkData(World world, Random random, int chunkX, int chunkZ, BiomeGrid biome) {
        // TODO Chunk generation code here.
    }
}
This method will be called anytime a new chunk is being created to get the chunk's details.
- Add a ChunkData variable to the method and assign it with createChunkData(world):
ChunkData chunk = createChunkData(world);
We will fill the chunk's blocks into this variable and return it to the method.
Adding a height generator
Each biome in Minecraft has different heights, and in that biome the heights vary too. For example the Plains has a flat, low terrain, but the Extreme Hills biome has super high, steep, rocky cliffs. The height of each location is determined by an octave generator. It will make a randomized, but smooth terrain and you can use it for creating different kinds of biomes.
- Create a SimplexOctaveGenerator in the method, use the provided world's seed as its random's seed:
SimplexOctaveGenerator generator = new SimplexOctaveGenerator(new Random(world.getSeed()), 8);
The second argument is the number of octaves. Remember not to place the octave generator anywhere else.
- Set the scale of generator to 0.005D.
generator.setScale(0.005D);
You can change the scale if you want. The larger the scale is, the steeper the terrain.
Generate the chunk's heights and blocks
Each chunk's X×Z dimension is always 16×16. We will use the SimplexOctaveGenerator above to determine the height of each (X, Z) coordinate, and then generate blocks vertically onto that coordinate.
- Create a for loop for integer Z inside the a for loop for interger X. They will run from (0, 0) to (15, 15) which indicates the current (X,Z) coordinate we are working with:
for (int X = 0; X < 16; X++)
    for (int Z = 0; Z < 16; Z++) {
        // TODO Heights and blocks generation code here.
    }
- Make an integer currentHeight inside the class. As the name explains, this variable stores the current height acquired from the SimplexOctaveGenerator each time we work with an (X,Z) coordinate of the chunk.
- In the for loop, assign the octave generator's noise of the current (X,Z) coordinate of the world to currentHeight after adding the result with 1, multiplying it by 15, adding it with 50 and casting it to integer.
The current (X,Z) coordinate of the world can be retrieved by multiplying the chunkX, chunkZprovided and adding each of them with the current chunks's X, Z:
currentHeight = (int) ((generator.noise(chunkX*16+X, chunkZ*16+Z, 0.5D, 0.5D, true)+1)*15D+50D);
Why 15 and 50? 15 - the multiplier is the amount of difference between the highest and lowest possible heights of the world, and 50 is the minimum height of the whole world. You can change these if you want.
- After retrieving the height, we are going to set the blocks for the current (X,Z) coordinate.
- Set the highest block of the "pillar" to grass block:
chunk.setBlock(X, currentHeight, Z, Material.GRASS);
- Set the lower block to dirt:
chunk.setBlock(X, currentHeight-1, Z, Material.DIRT);
- From the third block to the almost bottom block of the "pillar", place blocks of stone:
for (int i = currentHeight-2; i > 0; i--)
    chunk.setBlock(X, i, Z, Material.STONE);
- Finally, set the very bottom block to bedrock:
chunk.setBlock(X, 0, Z, Material.BEDROCK);
- At the last line of the method, return the chunk:
return chunk;
Now the CustomChunkGenerator should look like this:
public class CustomChunkGenerator extends ChunkGenerator {
    int currentHeight = 50;

    @Override
    public ChunkData generateChunkData(World world, Random random, int chunkX, int chunkZ, BiomeGrid biome) {
    	SimplexOctaveGenerator generator = new SimplexOctaveGenerator(new Random(world.getSeed()), 8);
        ChunkData chunk = createChunkData(world);
        generator.setScale(0.005D);

        for (int X = 0; X < 16; X++)
            for (int Z = 0; Z < 16; Z++) {
                currentHeight = (int) (generator.noise(chunkX*16+X, chunkZ*16+Z, 0.5D, 0.5D)*15D+50D);
                chunk.setBlock(X, currentHeight, Z, Material.GRASS);
                chunk.setBlock(X, currentHeight-1, Z, Material.DIRT);
                for (int i = currentHeight-2; i > 0; i--)
                    chunk.setBlock(X, i, Z, Material.STONE);
                chunk.setBlock(X, 0, Z, Material.BEDROCK);
            }
        return chunk;
    }
}
Test the generator
- Add these lines to your main class:
@Override
public ChunkGenerator getDefaultWorldGenerator(String worldName, String id) {
    return new CustomChunkGenerator();
}
This will make our chunk generator in action when new chunks is needed.
- Build the plugin by Maven Build → package goal. It should have built the .jar sucessfully.
- Prepare a Bukkit server. Put the compiled plugin into the plugins folder. Delete the main world save folder. Add these lines to bukkit.yml:
worlds:
  world:
    generator: plugin
# Replace "world" with the name of the server's main world name.
# Replace "plugin" with your plugin's name.
- Start the server. Login to the server. You will see something like this:
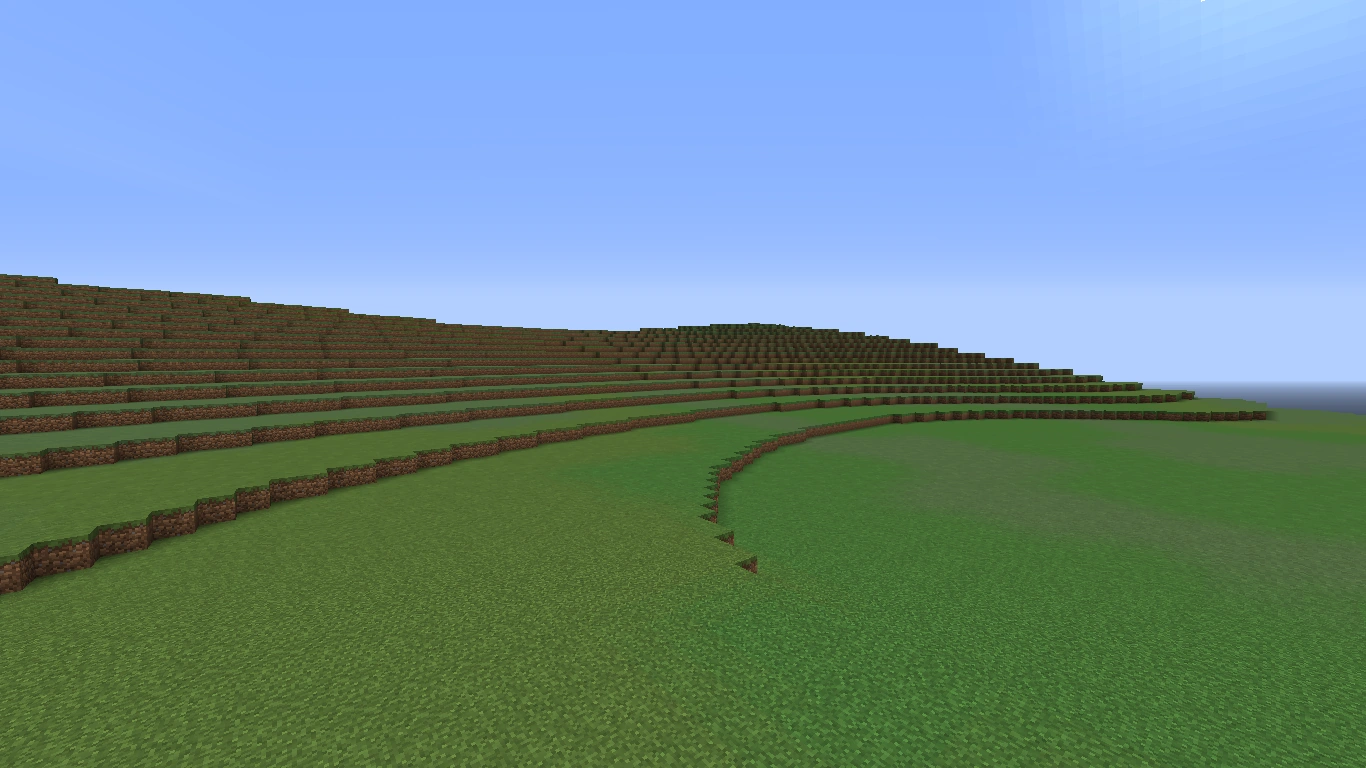
It's a barely flat, boring world, much like the beginning of Minecraft (the very first version of Minecraft was a flat cube of blocks), but don't worry, we are going to add more stuff into this world later.
Creating block populators
As explained above, after a new chunk is filled in with the basic terrain, it will meet some block populators to be filled in with the details and structures, such as: trees, ores, dungeons, mineshafts, etc...
In this section, we are going to create some block populators to spawn some trees, some water and lava lakes, some veins of ore and some dungeons.
Create a tree populator
This will make a 50-50 chance of creating 1 to 5 trees per chunk.
- First, create a class named TreePopulator extending the class BlockPopulator.
If the IDE warns you about making the class abstract, ignore it and continue on the way.
- Override the superclass's method populate:
@Override
public void populate(World world, Random random, Chunk chunk) {
    // TODO Tree populator's code here
}
Again, don't make the method abstract even if the IDE warns you. It will be OK.
- Use the provided random inside the method to make the chance of spawning trees:
if (random.nextBoolean()) {
    // TODO Tree generation code here
}
- Inside the if, make a for loop of an integer i running from 1 to a random integer from 1 to 5.
- Inside the for loop, generate a tree on a random location. Luckily, we don't have to build the tree block-by-block. Instead, we get the highest block on a randomly chosen (X,Z) coordinate of the chunk and generate a tree on top of the block by an available tree generation method from Bukkit:
if (random.nextBoolean()) {
    for (int i = 1; i < random.nextInt(4)+1; i++) {
        int X = random.nextInt(15);
        int Z = random.nextInt(15);
        int Y = 1;
        for (int j = world.getMaxHeight()-1; j > 0; j--)
            if (chunk.getBlock(X, j, Z).getType() != Material.AIR) {
                Y = j+1;
                break;
            }
        world.generateTree(chunk.getBlock(X, Y, Z).getLocation(), TreeType.TREE); // The tree type can be changed if you want.
    }
}
Registering block populators
Like the chunk generator, every block populators must be registered before they can work.
Inside the CustomChunkGenerator class, insert this method:
@Override
public List<BlockPopulator> getDefaultPopulators(World world) {
    return Arrays.asList((BlockPopulator)new TreePopulator());
}
Now you can recompile the plugin and see it works in the server. It will be something like this:
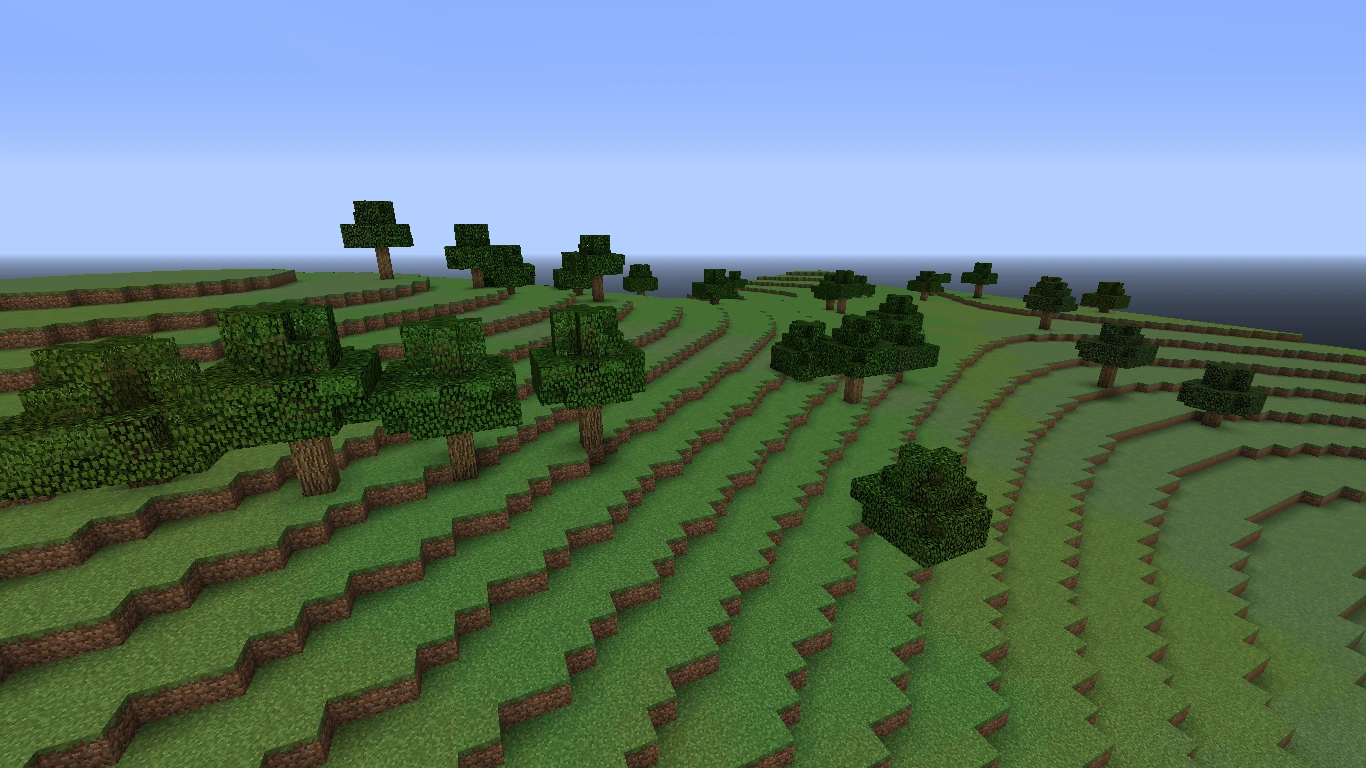
(To be continued...)
| Language | English • беларуская • Deutsch • español • suomi • français • italiano • 한국어 • Nederlands • norsk • polski • português • русский • lietuvių • čeština |
|---|